Je Mange


“I eat therefore I am”– Culinary Genius

Wednesday, September 27, 2006

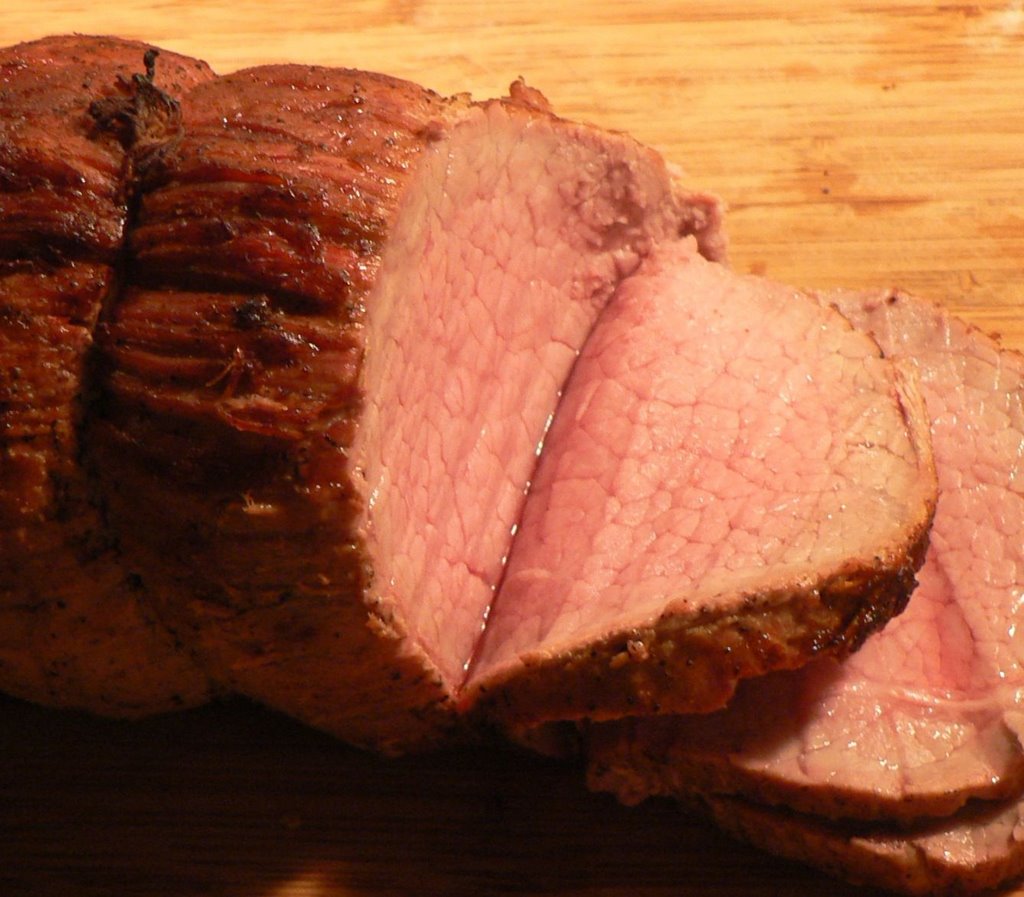
Roast: Beef Eye Round

The eye round roast is fabricated from the primal called the round. Primals are large, standardized cuts of meat take from the carcass. Since bovine are so large we generally don't use a whole primal but cut it down into smaller cuts; this process is called fabrication. These smaller cuts are not standardized per se but many are in general use.

The round is essentially the bovine's back leg. Cuts from the round are generally thought of as tough (and cheap). The rule of thumb is that the closer the cut is to areas of work the more connective tissue and flavour it has. Connective tissue connects muscles to each other and to bone. The cut I bought is called the eye, which is a long muscle in the leg.

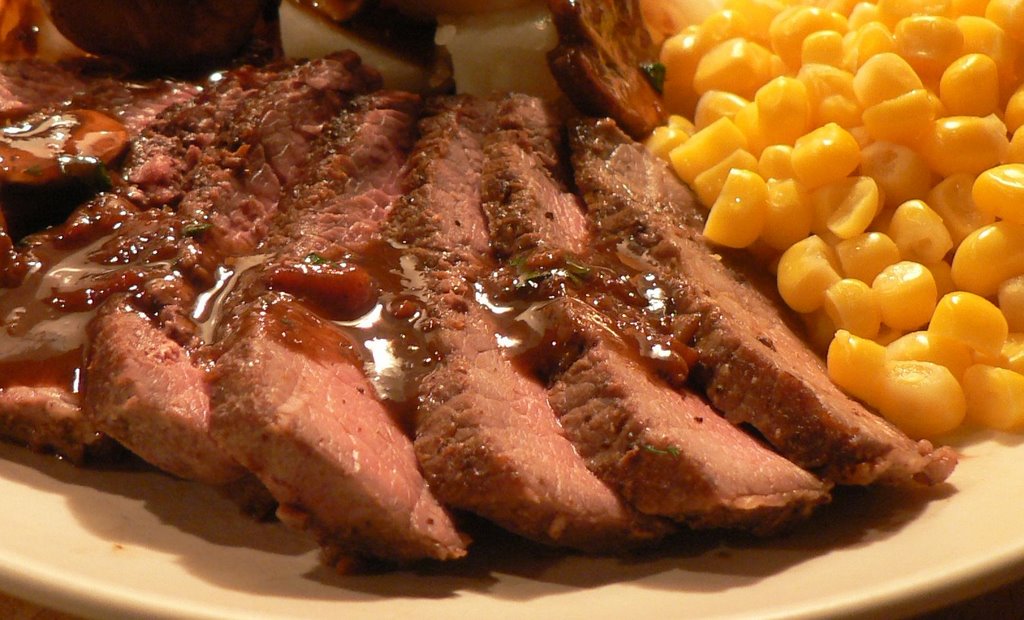
As you can see from the photo the meat has large fibers, one obstacal in creating a tender dish. Cuts from the round don't have to end up tough, the cook simply needs to account for it's needs. Meat with high connective tissue benefit from certain methods of cooking; braising, slow roasting & stewing. This meat would also be good in stir fry taking advantage of marination.

Tonight's challenge was slow roasting. The method I used is based upon several sources: Cooks Illustrated, Good Eats, my text book On Cooking 3rd Ed. and another book called La Varenne. I'll tell you now that I had mixed results; encouraging but it could have been better. I found that the meat had good flavour and was fairly tender if cut very thin otherwise it was tough.

Ingredients:
3-4 lbs Cheap Beef Roast
Salt & Pepper to taste
1-2 T fat
~1 C Mirepoix, medium dice
~⅓ C Red Wine
~1 C Stock

  1. Preheat oven to 250°F.
  2. Season roast with salt and pepper as desired. Don't skimp on the salt.
  3. Brown the roast in some fat over medium high heat. Use olive oil, vegetable oil or mixed with some butter. The pan should be heavy-ish, conforms to the roast (not too big otherwise the fond will burn) but not too small (the roast shouldn't press the sides).
  4. Remove the roast and put the mirepoix in the bottom, rest the roast on top.
  5. Cook the roast in the oven until 110°F internal; about 45-60 minutes.
  6. Increase the oven's temperature to 500°F and cook the roast to 130°F internal; about 15 minutes.
  7. Remove the roast from the oven, set the roast aside to sit for 20 minutes. This allows the juices inside the roast to redistribute evenly throughout the meat.
  8. During this time put the pan over medium high heat. Add the wine and scrap up all the little brown pieces, dissolving them (this is known as deglazing).
  9. Cook the wine down until it is almost gone, about 3 minutes.
  10. Add the stock, bring to a simmer and reduce for another 5 minutes or to desired consistency. Strain.
  11. Slice the meat quite thing, no more than 3 mm.
  12. Serve.
Next time I will try using a roast from the chuck primal; there is more marbling which helps keep the meat more tender and juicy. Or perhaps I'll try my hand at barding or larding; techniques in which pork fat is used to cover or is internally distributed thereby basting the meat as it is cooked.

Tuesday, September 26, 2006

Soul Seasoning

Spice Supreme has a new ace up its sleeve; atleast I think its new, I've never seen it before. I enjoy looking through the spices to discover their new concoctions.

Mama'soul sea-zon-nin is comprised of salt, black pepper, red pepper, garlic, onion, 'spices', oleoresin paprika & calcium stearate; in that order.

On Sunday the ball'n'chain and I went to Astoria to get a free stock pot. Sadly the R rain failed us and we got out and walked, figured it wouldn't be too bad. We ended up walking 30 plus blocks at top speed. After securing the 32 qt mammoth we felt a bit peck-ish; enter Mike's Diner, just off the last stop on the N train. We both decided upon the goo'ol hamburger deluxes.

These burgers come with fries, onion rings, pickles, lettuce, tomato (two slices) and slaw. We were very excited about the onion rings; sadly we only received two each; we ordered a side of onion rings. The fries were good, above decent; not as crisp as I'd have liked. The burgers were tasty and juicy, decently sized at 7 oz.

After finding this jewel seasoning I decided we would have another go at hamburgers (after listening to the woman rave about them and the need to visit other burger joints). I seasoned both burgers with salt, black pepper, onion powder and garlic powder. I also worked in some bread soaked with milk; apparently it helps keep well done patties moist. I dusted the soul seasoning on both sides of my slab of meat.

We ate our beef on sesame seed buns with sautéed onions. The only other condiment used was ketchup. Interestingly enough compared to Mike's meat ours was discernibly larger. Likely Mike uses rather fatty cow.

Conclusion: we both found the burgers very tasty but found that mine was more so.

I'm forced to reconsider my culinary endeavours; perhaps my dishes need a little more soul....

Monday, September 25, 2006

Stock: White Chicken

Today I'm making white stock (as opposed to brown). In French cuisine stocks are divided into two camps; white and brown. My Chef instructor is of the opinion that the biggest difference between home and professional cooking is the use of stock. Using stock instead of water gives much more depth to any dish.

I'm using 7 lbs of chicken bones, mostly carcasses I bought in China Town and some thigh bones from my freezer. These items are known as the nourishing element of the stock, thus defining its nature; I'm making chicken stock.

I have read in Asian cookbooks about using pork to enhance the flavour and consistency of stock. I've added 2 lbs of pork knuckle bones; I chose the knuckles since they are high in collagen which makes stock gelatinous (one sign of good stock). If memory serves I've read accounts of Carême or Escoffier suggesting the addition of pork to stocks and braises.

The quantity of mirepoix is given as a ratio to the quantity of bones (and meat if you're rich). The ratio is 1 to 7 by weight. Mirepoix is roughly a mixture of onions, carrots and celery; their ratio is 2:1:1 by weight respectively. So I should have about 1⅓ lbs of mirepoix, half of which is onion. Honestly I rarely weigh them, I just go by approximations. I think it would be a good idea to weigh these ingredients at the beginning to create a baseline upon which to make approximations in the future.

The last component of stock is the sachet or bouquet garnis. Generally it is a mixture of herbs and spices often inside cheese cloth. You could even use a tea ball or nothing at all since the stock will be heavily strained (however only do this is youre using whole herbs otherwise it becomes difficult to skim). The most basic bouquet garnis is comprised of the bayleaf, pepper corns, thyme and parsley stems (or whole, with roots depending on who you ask) if you have it.

Without further theorizing (more will come later) the procedure for white chicken stock:

Ingredients:
7 lbs chicken bones
½ lbs Onions, small dice
¼ lbs Carrots, small dice
¼ Celery, small dice
2 Bay leaves
½ T Pepper Corns
½ T Thyme
5 sprigs of Parsley

  1. Put chicken bones in a large stock pot (in the vicinity of 23 qts).
  2. Fill with cold water 2" above bones.
  3. Bring to a simmer, skimming the top of scum and oil as needed.
  4. Once simmering skim well.
  5. Add mirepoix and bouquet garnis.
  6. Bring to a simmer.
  7. Continue skimming as needed. About every 10 minutes during the next 40 minutes.
  8. Chicken stock in general simmers for 4 more hours, beyond this rough guideline I can only say cook until done.
  9. Strain the stock.
  10. Cool in an ice bath or running water in the sink.
  11. Store in fridge.
  12. Once the grease has hardened on the top remove it (a procedure known as degreasing). The stock itself should be fairly clear and gelatinous. If you find there is debris in your stock bring it just to a boil and strain through a finer mesh.

A few points on stock making in general:
  • Never use hot water to begin stock; this will result in a cloudy stock.
  • Do not cover the stock, even when bringing it to a simmer.
  • Do not allow the stock to boil.
  • Do not stir the stock; don't disturb the bones. This will push impurities back down into the stock.
  • When straining to not push on the strained items, it will simply force out impurities.

Sunday, September 24, 2006

Purple Bell Peppers

Over the weekend past the girlfriend and I stumbled into the Union Square Greenmarket and purused several stands before limping onward. We saw Vermont honeys, buffalo and produce; these particular bell peppers caught my attention. Not only have I never seen purple bell peppers but they have a pungent aroma; hopefully they are well ripened.

The produce man described them as being sweeter than green but less so than red bell peppers. I really have no idea what to do with them especially since my girlfriend is rather picky. She likely won't eat them unless they are cut small or hidden.

Here they are unwashed, I won't wash them until I'm ready to use them. As you can see from the photo they look almost dusty. This is due to a waxy coating. Some fruits (yes they are a fruit, they have seeds, they are the plants ovaries) develop a waxy coating once picked. This is to help retain their moisture and thus they keep longer. In a wry manner this is a survival mechanism; if they spoil too soon the predators won't eat them and thus their seeds won't be dispersed.

Yung Squash Soup

My landlady is a little old Asian woman; she happens to grow vegetables in the front courtyard. Recently she presented us with gift of squash. In the past she has given us mint grown from her garden.

To be honest I've never cooked with squash before, let alone eat it with any regularity. Having no idea what to do with it I took a page from work and made a soup based upon our Butternut Squash Soup.

The ingredients and procedure were described to me and the following recipe is an approximation since I didn't measure anything nor had any measurements to go by. What I can say for sure is that this soup turned out wonderfully and I'd certainly make it again.

At work we add kernel corn after it has been puréed. I think boiled potatoes would work well or perhaps reserved small diced squash and carrots. I didn't have any coconut milk in my cupboard but used evaporated milk and desiccated coconut. I steeped the milk and coconut and strained it out.

I named this soup 'Young Squash Soup' not after the type of squash, I have no idea what type it is nor its age. The soup is named after its benefactor Mrs Yung.

Tuesday, September 19, 2006

Mirepoix & Tomato Pincé

"Mirepoix" is a French culinary term; it is a combination of vegtables used primarily in stock. The use of mirepoix is to impart nutrients, depth and flavour. In some preparations it is used in the final dish, as in poisson à la nage, but usually it is strained out. The ratio of vegtables is (loosely) 50% onions, 25% carrots and 25% celery. The size of the mirepoix is directly related to the cooking time. In brown sauce preparation it is going to be cooked for a very short periode of time therefore we need a very small cut; say about ½ an inch cubes. As a counter point, the mirepoix used for veal stock, which simmers about 8 hours, the vegtables might be cut at 1 ½ inches.

Tomato pincé used in brown sauce is loosely any tomato product used to impart depth and colour; adding richness. The tomatos acidity is often utilized as well; it helps bring out the flavours and balances. In the industry tomato paste is commonly used.

Monday, September 18, 2006

Brown Sauce to Demi-Glace

Demi-glace is derived from the French traditional Brown Sauce called espagnole. Espagnole is traditionally not used as such; it is normally made into demi-glace to create its daughter sauces. Here is an earlier post using demi-glace in a sauce.

Creating demi-glace can be expensive and time consuming. We sometimes use what is called a "jus lié" in its place. It is simply brown stock thickened with starch (such as arrow root) or reduced to the correct thickness. Jus lié lacks the depth and body achieved by the traditional demi-glace however in modern American cooking reductions (as opposed to sauces thickened with starches) are often more popular.

To make 1 pint of espagnole you will need:

2 oz Brown Roux
~1.5 pt Brown Stock
1C Mirepoix
~1 tsp Tomato Pincé

  1. Create the roux, add the mirepoix towards the end to caramelize.
  2. Add pincé, then wisk in the brown stock.
  3. Bring to simmer and reduce until nappé. If need be add stock to thin.

To make demi-glace:
one part espagnole
one part brown stock

  1. Combine ingredients.
  2. Reduce by half.

Tuesday, September 12, 2006

Ken Hom: Cookbooks

I bought my third cookbook by Ken Hom yesterday; "Ken Hom Chinese Cooking". It is a very handsom hard cover book published by the BBC. The photography is modern as is the layout however I wish there were more photos of the dishes and in the ingredient section. I've perused the recipes and they all look lovely. It is marketed as an updated version, recommended as a reference. I can't wait to try the recipe for "deep fried milk".


I like Ken Hom, the BBC and this book however if I were to choose out of all my Ken Hom cookbooks it would be "Chinese Technique: An Illustrated Guide to the Fundamental Techniques of Chinese Cooking by Ken Hom with Harvey Steiman". This is a much older book with mostly black and white photos however there is a plethora. It is the only cookbook in which I have seen step by step instructions on skinning a whole chicken (leaving the skin intact), stuffing it and then deep-frying it. This book instructed me to fabricate a whole chicken, as well as leading me in making Peking Duck the first time. Don't get me wrong, I am happy to have both but one can not replace the other.

A Scale is Worth a Thousand Words

We bought this scale while out shopping yesterday. It was a nifty 9.95$ at Marshalls. We also bought a digital thermometer, also by Polder, for 14.95$. It is the type with a probe on a metal lead meant to be used in the oven.

Scales are quite important when cooking with dry food stuffs due to altitudes and humidity. Don't ask for the science behind it, I'm not particularly sure. I was like you, I didn't mind so much if my dry goods were off a little, to measure by volume was fine, I just wanted to eat dinner; however I've found that many cookbooks give only weight measurements for dry.

Thermometers are very important as well. Some people like to cook food until they are absolutely positive it is done, yet this method usually leads to over cooking. It is true that with lots of meats you can tell its doneness simply by pressing on it. I feel it is best to develop a point of reference based upon rigorous temperature readings. Also it is much harder to determine doneness through feel alone with large cuts of meat cooked in the oven, hence my thermometer. This handy tool also has neat features like an alarm once the present temperature has been reached.

Monday, September 11, 2006

Döner Kebab, Canadian Style

My first attempt at creating an Eastern Canadian Shawarma; aka donair.

The results were just about passable; I'd make it again once in a while. It reminded me of home in a good, nostalgic way. It was certainly good enough to wet my interest in developing my own recipe.

I pulled the recipe from the net, the recipe is Dash Rip Rocks’. I won’t reproduce it here but I will say that I used ground pork and minced onions & garlic as opposed to ground beef and powdered garlic & onions (simply because I didn’t have any in the house). I did not toss the meat as much as the recipe indicated and I believe it suffered. The loaf was much easier to cut after it had cooled overnight.

In the future I’m planning on trying it again with ground lamb. I’ll tweak the spices and do away with the minced garlic in the sauce. The sauce itself didn’t thicken enough for my liking; I’ll have to experiment with it.

Tuesday, September 05, 2006

Fried Rice with Sweet Thai Sausage

A delicious fried rice which has naturally evolved over time. Fried rice is something I first attempted about 10 years ago. Over the past 3 years my fried rice has improved beyond my expectations (or perhaps it was taste buds doing the developing?).

Fried rice should not be heavy or sticky; it should be light and fluffy. It should satisfy its purpose, which it is generally either meant to function as a backdrop to the rest of the meal or as a full fledged active component of the meal. This will define the character of your fried rice.

The most important thing to remember when cooking fried rice is moisture. Remember that different types of rice have different moisture contents when cooked; how you cook the rice also plays a role. I find that simple is best using long grain white rice; use whatever method you prefer just make sure its not too sticky, some moisture is fine though. I use a rice steamer to cook my rice; my girlfriend boils it on the stove. She overcooks it sometimes but otherwise both methods work fine.

When making fried rice it is best you use day old rice. Refrigerated rice is firmer and has less moisture; its texture is perfect for making fluffy fried rice. You can also use rice that has been frozen. Before you add the rice to the pan make sure that you crumble it or break it into small pieces. I recommend taking out the rice ahead of time to bring it closer to room temperature.

With regards to added ingredients be mindful of their moisture content. For instance if you add parboiled mix veggies (eg corn and veggies) make sure they aren’t wet. Never pour off the water and overturn the pot into the fried rice. For such an instance I recommend using very little water and boiling it all off, leaving the veggies dry.

As with all Asian cooking be conscious of the size and shape of the ingredients. My thoughts on the matter, try keeping all the ingredients about the same size and shape. One exception is for a main ingredient like shrimp.

My Thai fried rice is very simple; it is light and fluffy with little pieces of delicious sweet sausage. I’ve only found this sausage at my favorite Thai grocer. I was unable to find it online but, if memory serves, they deliver. The best way to serve it in fried rice is to cut the sausage in halves, cut each half into fourths lengthwise, then cut them into cubes. I believe that’s just about a small dice. Next slightly brown them in a dry pan over medium heat (they burn easily due to their high sugar content). Do not substitute Chinese sausage.

Without further ado:

Salt and Pepper to taste
4-5C long grain white rice (see above)
1.5 Thai Cooked Sweet Sausage, browned
2 T light (in terms of colour) soy sauce
1/3C of kernel corn; parboiled and dry
3-4 scallions, bias chopped
3-4 eggs

  1. Heat a good sized frying pan or wok over medium high, add enough oil to cover bottom plus a little more. Use more oil if your pan is not non-stick. Add rice, stir coating the rice.
  2. Add soy sauce, mix and stir, breaking up lumps of rice. Let rice heat. As the rice heats it will become much easier to break up all the clumps, dont kill yourself trying at this point.
  3. In a smaller skillet brown the sausage and add to rice. Mix in.
  4. Whip the eggs and season with salt. Scramble the eggs in the small pan. Make sure to use a generous amount of oil and that it is hot enough. Set aside.
  5. Heat corn in the small pan with enough water to just cover. You may add a little sugar to the water as it cooks. Cook until dry. Add to rice.
  6. Add the eggs to the rice, mix. Never add soy sauce after you've added the egg, it will ruin the beautiful yellow of the eggs.
  7. Season with salt and pepper. At this point you can hold it for quite some time. It is best to add the scallions just before eating to enjoy their crisp flavour.
  8. Add the scallions, mix and heat for another minute.
  9. Serve immediately.

Tomato Concassé

Tomato concassé is diced tomato which has been peeled and seeded. Technically the tomato only requires a rough chop but making a uniform dice is more pleasing to the eye, especially when the tomato is being used for garnish. The procedure is simple and with some practice can be preformed very quickly.

1. Remove the tomato skin (2 mothods)

a)Blanching:
  • Set up a pot of water to boil (not too small) and a bowl of ice water (or very cold water).
  • Mark an “x” on the tip of the tomatoes with a small knife (this will help you peal it).
  • Cut out the vine end (top) of the tomatoes, cutting as little tomato as possible.
  • Add tomato(s) to the water (not so much that the temperature of the water is brought down too much) the tomatoes should be able to swim.
  • Remove tomatoes after about 30 seconds (depending on the tomatoes freshness; the more fresh it is the less time it needs) you can take out a tomato and check the skin to see if its ready.
  • When the tomatoes are ready immediately plunge them into the water to stop the cooking process.
  • Peel the tomatoes. The skin should be slightly transparent. The tomato should be smooth and no flesh should come off on either the skin and by rubbing the tomato. If flesh does come off you have cooked the tomato too long (a very easy thing to do, simply continue)
b) Roasting:
  • Setup a bowl of ice water (or very cold water).
  • Mark an “x” on the tip of the tomato with a small knife (this will help you peal it).
  • Cut out the vine end (top) of the tomato, cutting as little tomato as possible.
  • Put tomatoes into a flame (eg over a fire, gas burner, blow torch). Let the skin char slightly and start to come away where the skin has been pierced.
  • Plunge the tomatoes into the water and then peel.

** Note you need not roast tomatoes as long as you would roast a bell pepper unless you wish for a roasted flavour (however I have not tried this myself). In my experience it is easier to roast if you need very little tomato.

2. Cut tomatoes in half through the middle (as opposed to from the top through to the bottom).
3. Seed the tomatoes. Do not squeeze them otherwise the tomato flesh will be crushed. I suggest two other methods, the first giving a cleaner product. For either method you can tap/slap the tomato on the cutting board (cut side down) to help remove the loosened seeds.

  • a) Lay the tomato on its side, cut side facing your knife hand. Using a paring knife cut the membrane holding the seeds in each compartment of the tomato. Scrape out the seeds with the blade of the knife. Do not hold the tomato in your hand since your knife could easily go through the tomato and into your hand.
  • b) If the tomato is large enough: hold the half in your hand and insert your fingers into the different compartments of the tomato, digging with your fingers to loosen the seeds. Dump and scrap out the seeds.
4. Clean up your work area.
5. Position the tomato half standing, cut side on the board. Use your knife to cut a ‘petal’; going from the top center downward, curving at first then straight down. Cut 3 or 4 ‘petals’ depending on the size of the tomato. There should be little membrane on the petals. Cut off any white/yellow/green membrane or flesh.
6. Dice or rough chop your petals depending on the intended usage.
7. The inner core and membrane can be used if it is ripe. Simply cut what can be used.

Monday, September 04, 2006

Jeffrey Steingarten: The Man Who Ate Everything

I happily received this book for my birthday last. I'm sure there are heaps of reviews of this book out there, let me be brief. Nearly every page was a delight to read, every second page encouraged chuckles and laughter.

I've yet to try any of the recipes but am eager to. I simply don't have the time or funds to rush out and try them all immediately. I will certainly post regarding those misadventures.

In closing I will unabashedly advise each and every one of you to rush out and buy this book for yourselves and loved ones (Barring that try your local library or liberating it from an undeserving relative). I can say this since only those who enjoy food a great deal would be reading my blog (know thy audience).

Chasseur Sauce with Sirloin Tips

My Companion whined for more steak so I picked up sirloin tips cut from the round. While shopping we also bought cremini mushrooms, cheap madeira, parsley and aged mirin.

The round is cut from the back leg and butt of the steer; a tough and sinewy cut. The sirloin is cut from the piece of the steer next to the leg, however part of the sirloin extends into the round, thus sirloin tips of the round. The general rule for tenderness of cuts is that the farther one gets from the 'working' areas the tenderer the meat.

Also, a steer is a male bovine that has been castrated. In North America most of the beef we buy in restaurants and stores is from steers. Retired dairy cows end up in the fast food grinders.

Mirin is a sweet Japanese wine. Ideally it should be golden yellow, rich textured with an alcohol content of about 14 percent. It should be good enough to drink. Normally you will find synthetic mirin which is generally unacceptable. Beware of recipes that sugest substituting sake or other rice wines; mirin is quite distinct. The best mirin I’ve found is imported from Mikawa Japan.


Ingredients:
Salt & Pepper
Steak (or other protein)
1/4 C Chopped Mushrooms
2T Chopped Whites of Green Onions
3/4 C Red Wine
1C Demi Glace
4T Tomato Concassé
Brown Stock
1-2T Chopped Fresh Parsley

  1. Season steak with salt and pepper.
  2. Cook the steak until done, set aside.
  3. Degrease the pan of most of the fat.
  4. Sauté the mushrooms until slightly cooked, season with salt.
  5. Add the onions and continue to sauté for another minute.
  6. Deglaze the pan with the wine and reduce until almost dry.
  7. Add demi glace, bring to a simmer and cook for several minutes.
  8. Cut mean into strips; reserve run off juices.
  9. Add tomato and meat juices.
  10. Reduce or add stock if sauce is too thick; it should just coat the back of a spoon.
  11. Salt and pepper to taste. Garnish with parsley and serve.
*Note: Chasseur sauce (also known as Hunter sauce) is normally made with white wine. You can also use other types of onion aromatics and tomato products.

Sunday, September 03, 2006

Nappé

As such “nappé” is a conservative culinary term used to describe the proper thickness of sauce; the thickness being so that the sauce will coat the back of a spoon. Another method to determine if the liquid has reached the proper thickness is to draw a spoon through the sauce, it should come together after a moments pause (this is, of course, in the pan and the sauce is about a centimeter in depth).

I say conservative since in modern American cooking (and quite possibly others) there is seen a great divergence from the old standards in French sauce making. Much thinner sauces are often used and deemed acceptable. There is a trend to make sauces without a starch thickener; such as reductions, broths and purées.

I am unsure if the term is actually used in modern French kitchens; I see no entry for the word in Larousse Gastronomique or in La Varenne Pratique. Nor after a cursory glance through the sauce entry of Larousse (which is extensive being around a dozen pages) did I see any use of the word.

My culinary arts text book defines nappé as such: (1) the consistency of a liquid, usually a sauce, that will coat the back of a spoon; (2) to coat food with a sauce.

Verily in French the word means tablecloth or a cover.

Saturday, September 02, 2006

White Miso & Onion-Garlic Sauce

Tonight dinner was composed of 3 parts:

-White long grain rice
-Pork and bean sprout stir fry
-Braised chicken thighs

According to my partner the bean sprout dish tasted ‘wholesome’; she promptly slid her share onto my plate. It seems the state of wholesomeness is diametrically opposed to that of savoury.

The chicken was defrosted yesterday & seemed a bit off; I have yet to learn respect for the Art of Freezing. A usefull skill that is often abused.

The sauce was delicious if not a tad too sweet for some. It also thickened too much. Cardinal rule: take it off the flame just before nappé otherwise it will become too thick by the time it reaches the table.


Salt
5 chicken thighs, skin removed
1 medium onion, small dice
1-2 cloves of garlic, chopped
4-6 T red wine
2-3 T white miso
1 T oyster sauce
3 to 4 T brown stock

  1. Season chicken with salt.
  2. Brown both sides of chicken; set aside.
  3. Degrease pan except for small amount of grease.
  4. Add onions, sauté briefly. Add garlic.
  5. Continue sautéing until onions are slightly browned, take care not to burn the garlic and fond.
  6. Deglaze pan by slowly adding red wine; reduce until almost dry (au sec).
  7. Combine miso, oyster sauce and stock; add to pan.
  8. Return chicken to pan (with any juice that may have run off).
  9. Bring to a simmer and turn heat low. Partially cover and cook until done.
  10. If sauce thickens too much while cooking add additional stock.

Welcome Fellow Gourmandes

Since I have little time for activities unrelated to food I decided to create this blog. For those whom aren't aware of my situation let me enumerate briefly:
  1. I love food and sleeping.
  2. This summer I formally began studying culinary arts at The Art Institute of NYC (formerly known as The New York Restaurant School).
  3. I work full time at a restaurant called Second Helpings.
  4. My girlfriend loves to eat yet hates to cook.